If you’ve done any deployment work with OS X Lion, InstallESD.dmg is probably not a new concept for you. But just in case you haven’t, or just in case you need a quick refresher, with the release of OS X Lion, Apple completely changed its distribution method for Mac OS X. OS X Lion is only available via an Internet download through the Mac App Store. And although downloaded as an application from the Mac App Store, Install Mac OS X Lion.app, contained within it is the disk image that makes the OS X Lion installer magic happen: InstallESD.dmg.
This may be because the script fails to detect that the virtual machine is still running with VBoxManage list runningvms and detaches MojaveBaseSystem.vdi, or because the VM loses access to MojaveBaseSystem.vdi for some other reason, or the VM can't allocate memory for diskutil or fails to run it for some other reason. Jun 12, 2013 How to Make a Bootable OS X Mavericks USB Install Drive. Double-click to mount “InstallESD.dmg” Open the mounted ‘OS X Install ESD’ image, and right-click “Base System.dmg” choosing “Open” to mount the image (BaseSystem.dmg may be named as “Base System.dmg” on some newer installers. Here’s how to convert a DMG file into an ISO file that can be mounted on a Windows PC. First head over to this website and grab yourself a copy of dmg2img by clicking on the win32 binary link. Once the file has downloaded, open your Downloads folder, right click on.
Actually, BaseSystem.dmg is compressed down to only 451MB (at least in OS X v10.7.0). Also, the volume naming is somewhat inconsistent. You've got /dev/disk1s3 named 'Recovery HD', but for some reason it's mounted as '/Volumes/Image Volume' in recovery mode. BaseSystem.dmg has a volume named 'Mac OS X Base System'.
InstallESD.dmg does more than just handle the initial Lion installation. Initially contained within it is also the disk image that forms the basis of Recovery HD. Because InstallESD.dmg is available via the web, users are able to reinstall Lion through Recovery HD or Lion Internet Recovery in worst-case scenarios without needing physical restore media.
Let’s take a deeper look at InstallESD.dmg, Recovery HD, and Lion Internet Recovery to see what they are, what they mean for you as a Mac Admin, and how they’re all related.
InstallESD.dmg
After downloading Lion from the Mac App Store, Install Mac OS X Lion.app is placed in the /Applications directory. InstallESD.dmg is located within the application’s Contents/SharedSupport directories.
InstallESD.dmg is the new-age Mac OS X retail DVD. As a Mac admin, you can use it to create an external bootable Lion install disk, build a NetInstall or NetRestore set, have it act as the Install DVD for an InstaDMG workflow, and more. A consumer installing Lion would have several pre-installation steps handled by the Install Mac OS X Lion application. After those completed, the installer would prepare InstallESD.dmg to be mounted as the boot volume. The computer would then restart and proceed with and finish the installation.
Looking inside of InstallESD.dmg, take note of two important files: Install Mac OS X Lion.app and BaseSystem.dmg. Yes, that is another Install Mac OS X Lion.app. That installer runs when booted from InstallESD.dmg. It is what actually installs Lion to the hard drive. BaseSystem.dmg is copied to the Recovery HD partition after it’s created during the Lion installation process. Let’s take a look at Recovery HD.
Recovery HD
As a Mac admin, you can rejoice in the fact that the days of keeping stacks of hardware-specific restore discs to reinstall Mac OS X are gone. Recovery HD is created during the Lion installation process as a very small hidden partition on the primary boot drive.
As mentioned earlier, BaseSystem.dmg can be found on Recovery HD, as shown below. Newer Mac models that support diskless Apple Hardware Test may also have a disk image for it contained within a hidden .diagnostics folder inside of the com.apple.recovery.boot folder.
When booted into Recovery HD, BaseSystem.dmg is mounted as the boot volume with the volume name “Mac OS X Base System”. This is shown in the com.apple.Boot.plist file (“rp” stands for root path).
The contents of BaseSystem.dmg are shown below.
In case you’re wondering, yes that is yet another Install Mac OS X Lion.app. That one runs when choosing to reinstall Lion when booted into Recovery HD. If you’re super clever, you might wish to customize the “Mac OS X Utilities” screen that is displayed when booted into Recovery HD (like the folks at Google have done). I’ll leave that to the true tinkerers, but taking a peek at the following application should get you started:
Because of Recovery HD’s small size, there is not enough room to store a copy of InstallESD.dmg within it. But thanks to its Internet availability, that’s not a problem. After authenticating with Apple and the iTunes store, the installer downloads a fresh copy of InstallESD.dmg disguised as a package. After download, the installer prepares InstallESD.dmg to be mounted as the boot volume, restarts the computer, and then continues with and finishes the installation.
It’s important to note that DHCP must be available for either a Recovery HD reinstallation of Lion, or a Lion Internet Recovery boot to function. Using Wireshark, I observed the process of reinstalling Lion through Recovery HD. There are far too many steps involved to list them all, but below are the ones I found to be most important. Note that I’m sure it’s possible that the random package names shown below can change, but they did remain consistent throughout my tests. It’s also safe to assume that the mirror names will vary by location, as they are Akamai mirrors. None of the following is officially documented by Apple; the implementation and details are subject to change at any time.
– After getting a DHCP address, osrecovery.apple.com is where it all begins. HTTP GET and POST requests are made to give the Mac a valid session cookie for the process. Some information about the Mac is sent back to Apple, including a model identifier and what appears to be a modified or encrypted version of the serial number.
– An HTTP GET request is made to a1166.phobos.apple.com for mzm.hgbvjzlz.pfpkg. This compressed package is what is responsible for performing the pre-installation checks to make sure the Mac meets the minimum system requirements for Lion. One of the more interesting pieces inside this package, and what allows Lion to be installed in a virtual machine, is this:
– An HTTP GET request is made to swscan.apple.com for Apple’s software update catalog.
– Various types of requests are made to iTunes (usually to ax.init.itunes.apple.com) to authenticate the user and ensure that Lion has been previously purchased. If it has not been previously purchased, the user won’t be eligible to reinstall through Recovery HD or Lion Internet Recovery.
– An HTTP GET request is made to a774.phobos.apple.com for MacOS_10_7_IncompatibleAppList.pkg. This package checks the system for any applications that are incompatible with Lion and moves them to an Incompatible Software folder during the installation. See http://support.apple.com/kb/HT3258 for more information.
– Finally, an HTTP GET request is made to a1166.phobos.apple.com for mzm.ajzbytae.pkg. I was unable to open this package after it downloaded, but can safely assume it is InstallESD.dmg. It is a 4.18 GB “package” and downloads during the installation step where the installer downloads “additional components” just before restarting.
I encourage you to packet capture the process yourself, whether it be through using a VM at home and sniffing your LAN traffic, or by using port mirroring on a switch. It’s interesting to observe just how many steps are involved behind the scenes. But what is even more interesting, is how Apple has created what appears to be globally available NetBoot over the Internet with Lion Internet Recovery.
Lion Internet Recovery
If for any reason Recovery HD isn’t available or otherwise becomes corrupted, Apple created Lion Internet Recovery as a last resort for users. It’s an EFI firmware function available on most Macs shipped in 2010 or later. It enables users to boot over the Internet to Apple’s servers which will eventually present Recovery HD through a downloaded copy of a BaseSystem.dmg equivalent.
Here’s a riddle: What looks like NetBoot, smells like NetBoot, even tastes a bit like NetBoot, but isn’t actually NetBoot? Lion Internet Recovery. Or rather, it’s not traditional NetBoot with BSDP, TFTP, etc. Almost all Lion Internet Recovery traffic is HTTP traffic.
Just like with Recovery HD, there are many steps involved in booting to Lion Internet Recovery, but below are the most important. None of the following is officially documented by Apple; the implementation and details are subject to change at any time.
– After getting a DHCP address, the process again begins with osrecovery.apple.com. An HTTP GET request with an HTTP User-Agent header of “InternetRecovery” is made to osrecovery.apple.com
Can I Delete Basesystem Dmg Free
– osrecovery.apple.com responds with an HTTP OK giving the Mac a valid session cookie
– An HTTP POST request is made to osrecovery.apple.com/InstallationPayload/RecoveryImage. Some information about the Mac is sent back to Apple, including a model identifier and what appears to be a modified or encrypted version of the serial number, just like with a Recovery HD boot.
– osrecovery.apple.com/InstallationPayload/RecoveryImage replies with an HTTP OK passing additional information back to the Mac, such as where to actually download the Recovery Image from which it will boot.
– An HTTP GET request is made to oscdn.apple.com for RecoveryImage.chunklist. From what I can tell, this file is a checksum of sorts for the recovery image. The actual request for the image, detailed in the next step, uses HTTP range headers. I assume that comparing what has already been downloaded to the contents of the chunklist allows the Mac to only download the parts of the image it requires. This was most likely implemented to handle any network disruptions that might occur during a Lion Internet Recovery boot.
– Finally, an HTTP GET request is made to oscdn.apple.com for the RecoveryImage itself, appropriately named RecoveryImage.dmg. With Lion Internet Recovery, RecoveryImage.dmg is synonymous with BaseSystem.dmg.
Once booted to Lion Internet Recovery, the steps the installer performs to reinstall Lion are identical to those mentioned earlier that occur during a standard Recovery HD initiated reinstallation.

Lion Internet Recovery is an impressive feat of engineering. Again, I would strongly encourage you to packet capture the process to see how it works for yourself. If you’d like to see the full packet capture output from my Lion Internet Recovery boot, it is available here.
Putting It All Together
InstallESD.dmg, contained within the Mac App Store downloadable installer, is at the heart of Recovery HD and Lion Internet Recovery. Recovery HD is there when your users need it, and Lion Internet Recovery is there as a last resort just in case Recovery HD is not. Both rely on BaseSystem.dmg (or RecoveryImage.dmg in the case of Lion Internet Recovery) to provide them with a minimal interface with a few utilities and the ability to reinstall Lion. When choosing to reinstall Lion, either from Recovery HD or Lion Internet Recovery, the installer downloads the latest copy of InstallESD.dmg from the Internet in order to proceed with and finish the reinstallation.
Hopefully after reading this article, the Lion installation and recovery processes have become clearer. Understanding the relationships between them and InstallESD.dmg is critical for deploying Lion and understanding the recovery options available to your users. Hopefully they won’t need to use Recovery HD nor Lion Internet Recovery nearly as many times as I needed to in order to write this article. Fortunately for me, my ISP doesn’t have a bandwidth cap.
On every OS X Lion installation a hidden partition is created to enable a method for Lion to be reinstalled on the machine, it is known as the recovery partition or drive and is 650mb in size. Dmg to rar converter free download.
If you bought a new machine from Apple you have OS X 10.7 already installed – but no back up disk! and since you haven’t bought the OSX Lion 10.7 App from the App store you can’t re-download it – so thats why you have the recovery drive as a partition in your main hard drive and to boot from it you need to restart the machine holding down “command” + “r” keys.
From recovery mode you can run Disk Utility, get online help and do a restore from a Time Machine backup and re-install Lion leaving all your other files intact – it just replaces the core operating system.
You can make a bootable USB drive or disk of the recovery drive, but involves a small trip to the Terminal….

1) Launch Terminal from /Applications/Utilities and run:
The primary drive in this list is No.2 with the “Identifier” of disk0s2, the boot recovery drive is disk0s3
We can also identify the recovery drive by the name and the size – set at 650mb
2) Mount the drive:
Output should be:
Now the Recovery HD is mounted in the Finder and you can see it in the sidebar under Devices
Navigate to it from the sidebar – Recovery HD/com.apple.recovery.boot/BaseSystem.dmg.
Navigate to it from the sidebar – Recovery HD/com.apple.recovery.boot/BaseSystem.dmg.
3) Doubleclick BaseSystem.dmg to mount it also in the sidebar. This will mount the volume ” Mac OSX Base System”
mac-osx-lion-base-system
4) Open Disk Utility in /Applications/Utilities
5) Put in a 2GB+ USB drive, let Disk Utility load it. The USB drive needs to be formatted as Mac OS Extended Journaled, if its not, its time to format it in Disk Utility…
6) Finally in still in Disk Utility, select the “Restore” tab – drag the mounted volume “Mac OSX Base System” into the Source field and drag the USB drive “Volume” (mine is called SuperBootUSBDrive) to the Destination.
restore-volume-osx-usb
7) Click Restore – 25 minutes later – One bootable USB drive
Your bootable USB drive will be called “Mac OS X Base System” after the restore is complete. Now to boot from it just select it as the Start Up disk in System Preferences or hold down option key on boot and select it from the choice of bootable devices.
If you have downloaded the Lion App from the App Store then you can also make a boot disk/drive from this, guide is here, you need to make the boot drive/disk before you install the Lion App, as the installer is deleted after running it. Thats why the guide here can get you out of trouble.
Couple of footnotes on this – Apple has released a knowledgebase article about the recovery partition, also just released from Apple is an app that will do the same as above.
Update For Newer Models – hidden BaseSystem.dmg
If you have the latest models from Apple that came already shipped with OSX 10.7, then you may not have the “BaseSystem.dmg” but instead see a “BaseSystem.chunklist” , the “BaseSystem.dmg” is there it’s just hidden.
Jul 28, 2011 Install 가능한 DMG추출 - Mac OS X Lion 설치파일에서 오른쪽 버튼을 눌러 패키지 내용 보기 - InstallESD.dmg파일을 이미지 DVD굽기를 하면된다. 다른 어플에서 굽기 위해서는 복사해서 파일을 이동해야 이 파일을 선택할 수가 있다. MAC:: OS X Mountain Lion 10.8.0 정식버전 빌드버전은 GM버전과 마찬가지로 12A269입니다. GM이 정식발매품과 같다고 보면 될거 같네요. 실제 가격도 19.99달러로 우리나라돈으로 대략 2만원대로 아주. 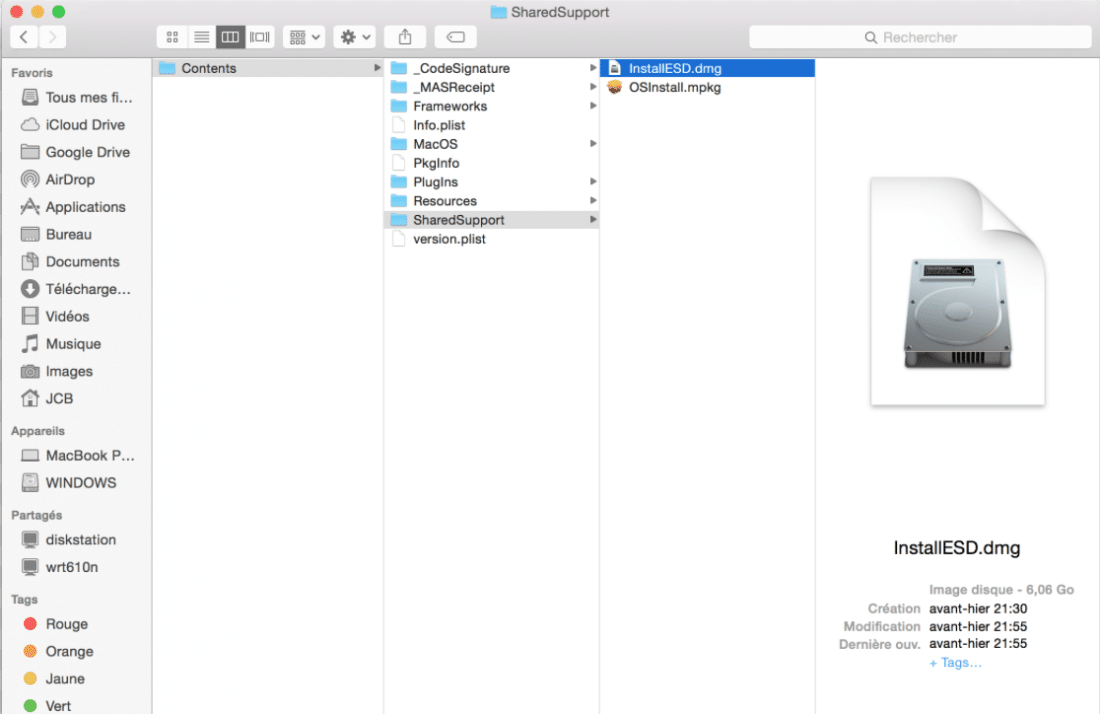 Mac OS X Lion 10.7.5 Retail 순정 설치 디스크 이미지 파일입니다.Mac OS X Lion 은 10.7.5 까지가 마지막 버전이고, 빌드 번호는 11G63 입니다.저는 삼성 구형 센스 Q36 노트북에 설치할 때 사용하였습니다.그리고, 옛날 자료이다 보니 혹시 OS X Lion 설치 파일이 필요한 분도 혹시 계실 것 같아서 업로드하였습니다.
To show it so you can see it in the finder – go to Terminal – enter:
Now it will be visible in the Finder.
